


 Reply With Quote
Phenomenal and very important DIY, beautiful write-up. Repped!


NOTE:
Use fender covers to avoid damaging painted surfaces!!
To avoid damage, unplug the wiring connectors carefully while holding the connector portion.
To avoid damaging the cylinder head, wait until the engine coolant temperature drops below 38°C (100°F) before loosening
the cylinder head bolts.
Mark all wiring and hoses to avoid misconnection. Also, be sure that they do not contact other wiring or hoses, or
interfere with other parts.
Tools needed:
Ratchet and extensions 1/4in and 1/2in
10mm socket/wrench
12mm socket
14mm socket/wrench
Crank pulley tool or impact gun
breaker bar
pan for fluids
Also be patient and oraganize your self
-Disconnect the battery negative terminal.
-Drain the engine coolant / oil
-Relieve fuel pressure.
-Remove the (EVAP) canister hose and brake booster vacuum hose.
-Remove the upper radiator hose and water bypass hoses.
-Remove the heater hose, harness holder mounting bolt and water bypass line mounting bolt.
-Remove the Positive Crankcase Ventilation (PCV) hose.
-Remove the serpentine belt.
-Remove the engine wire harness connectors and wire harness clamps from the intake manifold.
>Idle Air Control (IAC) valve connector
>Throttle position sensor connector
>Manifold Absolute Pressure (MAP) sensor connector
>Evaporative Emission (EVAP) canister purge valve connector
>Engine Coolant Temperature (ECT) sensor connector
>TDC sensor connector
>Camshaft Position (CMP) sensor connectors
>VTEC solenoid valve connector
>VTEC oil pressure switch connector
>Oil pressure sensor connector
-Remove the (A/C) line bracket mounting bolt.
-Remove the intake manifold.
-Remove the water bypass hose
-Remove the exhaust manifold
-Remove the dipstick, breather hose, harness holder mounting bolts, and remove the four ignition coils.
-Remove the cylinder head cover (VC)
-Remove the timing chain cover chain and guides.
-Remove cam cap bolts in sequence order, then the cams can come off.
-Remove the rocker arm assembly.(zip tie or use rubber bands on the rockers to prevent pins from falling off)
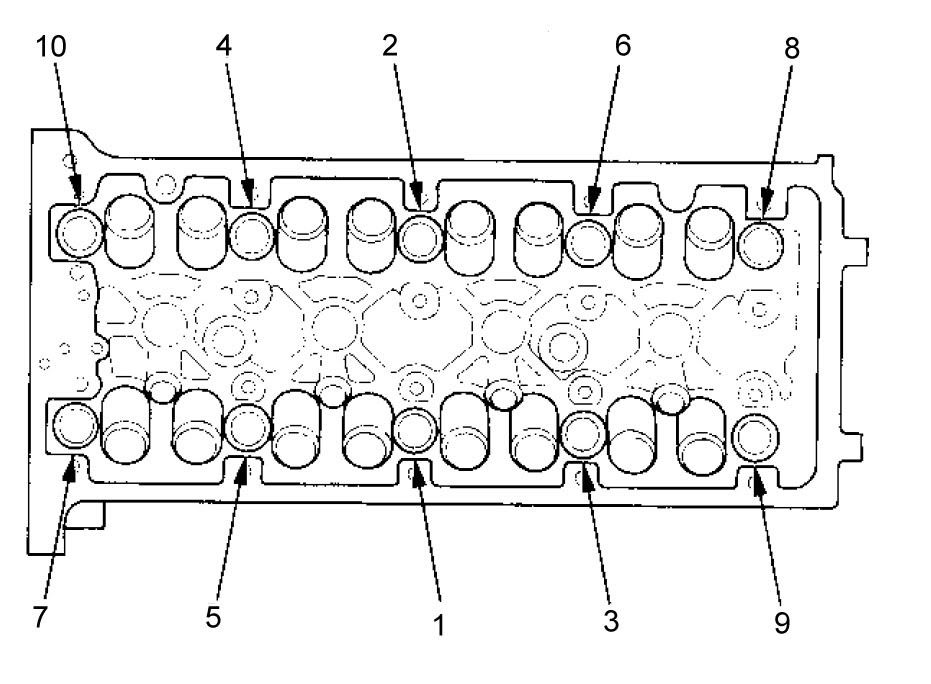
-Remove the cylinder head bolts. To prevent warpage, unscrew the bolts in sequence 1/3 turn at a time; repeat the
sequence until all bolts are loosened.
-Remove the cylinder head.


Phenomenal and very important DIY, beautiful write-up. Repped!
Need parts for your k-series setup? Check out our eShop! Click Here
For all your eShop support needs:BoostedK20.com eShop Support Forum
I suggest getting the crank pulley removal tool even if you have an impact, my impact (350 ft/lbs) wouldn't take it off, I had to use a breaker bar with a long pipe on it.
i have a electric 230ft tq impast gun and that sucker popped rite off
Also forgot to add if anyone accidentally starts dropping the pins off the rockers, here is the correct way to put them back together.

Nice! Mine took a shit load of force even with the big pipe on my breaker bar. Hardest thing I've had to take off yet... Harder than an axle nut.Originally Posted by monjarassi


Good info right here


This is beautiful! Thanks Martin!!
"As I lay rubber down to street, I pray for traction I can keep. But if I spin and begin to slide, please oh please protect my ride."
One-off SRT Top Mount Manifold - GT3076R
My Ruckus Build
My pleasure anything to help the community out.
And this will definitely help the community out for sure. Thanks for being a team player!
"As I lay rubber down to street, I pray for traction I can keep. But if I spin and begin to slide, please oh please protect my ride."
One-off SRT Top Mount Manifold - GT3076R
 Posting Permissions


Bookmarks